5 tips that every BioThane maker should know
5 Tips for safely tying a rope halter
You see them all over the internet, rope halters! Available in different colors and thicknesses, these are everywhere. It's vacation time, and you're feeling a bit bored. You think: tying a rope halter, I can do that too!" So, you search for an instructional video, believing you've made the halter correctly, and eventually, you want to use it for your horse or pony. You put it on, and ‘oops!’. Your halter falls apart. The first time tying a rope halter often goes wrong. To prevent accidents, here are 5 tips for safely tying a rope halter, just for you!
Use the right thickness of rope and purchase from an approved supplier
The thickness of the rope is crucial. Therefore, buy it from an approved supplier. My advice is to use 6 mm polypropylene rope. Thinner ropes can cause cutting, which is definitely not intended. Avoid buying rope from hardware stores; it's often much thinner than advertised and not suitable for making rope halters. If making a halter for a larger horse like a draft horse, opt for 8 mm polypropylene rope. Their larger heads can accommodate slightly thicker rope, giving a better appearance than a 6 mm halter. If you plan to make a noseband on your halter, choose 3 mm polypropylene rope.
Make the correct safe knots
It's crucial to make good knots and loops. Following instructions in a video while practicing can be hard. Take your time to practice the knots. If you don't understand, set it aside and try again later. Using the wrong knots can lead to dangerous situations.
Watch here our (video)tutorial: How to tie a rope halter for your horse
Use the right measurements
The measurements of a rope halter are crucial. Without them, you can't get started. People often suggest copying measurements from a standard stable halter. What they don't realize is that ready-made stable halters have different proportions than rope halters. If you copy these measurements, your rope halter will be either too big or too small. Make sure you know the size you need. If unsure about your horse or pony's size, measure the total nose circumference 2 cm below the cheekbone. Once you have this measurement, you can precisely determine the dimensions using a table.
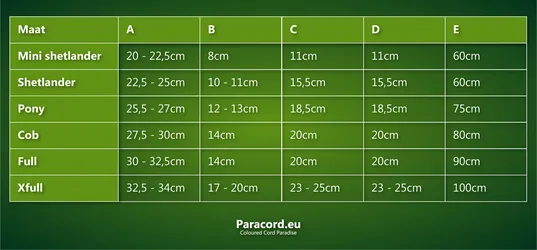

Have you measured the nose circumference? Divide this number by 2. Example: my horse has a nose circumference of 58.5 cm, then I come up with 29 cm. I look in the table and see that size Cob has a nose circumference between 55 cm and 60 cm.
Make sure the rope halter fits
As mentioned earlier, having a properly fitting rope halter is essential. A halter that's t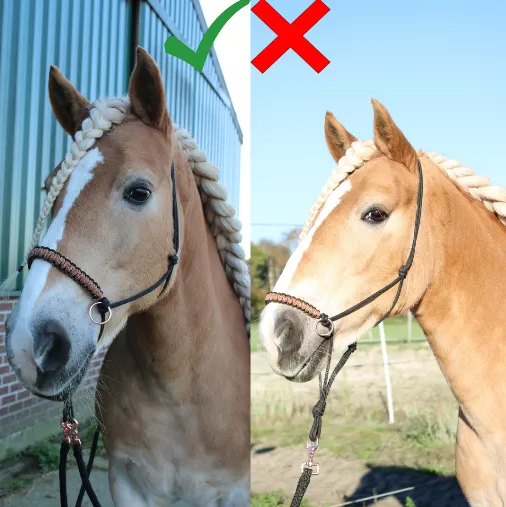 oo small can cause chafing, leading to wounds you want to avoid. A halter that's too large isn't comfortable for the horse either. It's preferable for the horse to be able to perform its natural movements like yawning, flehmen, or grazing. A halter that's too big hangs too low and can slip down under pressure. If the rope halter is significantly oversized, you'll notice it in its fit.
Here in the picture you can clearly see the differences with the rope halter which fits well and not well. The left rope halter sits 2 cm below the cheekbone, this is neither too high nor too low and fits well. The rope halter in the right photo, on the other hand, sits way too low. So low that when you use this rope halter, the halter drops off and you no longer have control over the horse.
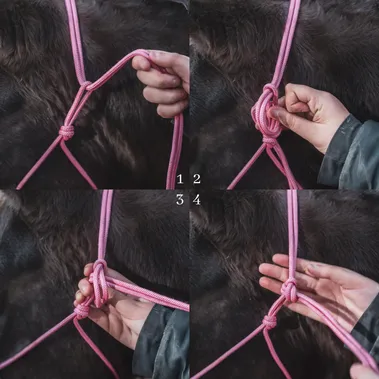
Close your rope halter with the right knot
Knowing the appropriate knot to use when closing a rope halter is crucial. If, for instance, you tie the knot incorrectly, the rope's end might get into the horse's eye. This could startle your horse into panic, which you want to avoid. Therefore, it's essential to have a specific closing knot. Below, you'll find a step-by-step guide on how to properly close a rope halter for safe use.